Responding to an Audit Finding

Responding to an Audit Finding

Once an audit finding has been recorded, a Respond to Finding task is generated and routed. A Respond to Finding task is generated for each finding.

  1. From Audit Workspace dashboard > Action Plan - All Open Tasks tab on the Portal Page, click the Respond to Finding link to the appropriate record.
    Result: The Respond to Finding window is displayed.

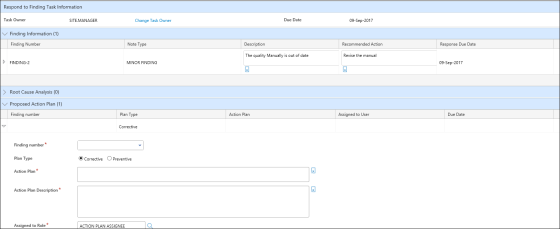
  1. Enter information in the following sections:
Section Description

Respond to Finding Task Information

Displays the Task Owner and the Due Date. Click the Change Task Owner link to assign this task to another user.

Root Cause Analysis

Click the Add Root Cause link to add a root cause analysis to the section. Enter the information in the following Root Cause Analysis section fields:

  • Root Cause Against - Select a Root Cause Against option. Default Root Cause Against options include the following:
  • Process - This option makes the Process field required.
  • Product - This option makes the Product field required.

NOTE: For more information on configuration, see Root Cause Against.

  • Product/Process* - Enter or zoom to select the product or process in which the root cause is against. This product/process information is populated by the information entered during finding creation.

NOTE: For more information on configuration, see Product Setup and Process Setup.

  • Failure Mode* - Enter or zoom to select the failure mode for which the root cause is against.

NOTE: For more information on configuration, see Failure Mode Setup.

  • Failure Mode Description - Enter a description in the Failure Mode Description field.
  • Root Cause* - Enter or zoom to select the root cause for the selected failure mode. The drop down contains the following filtered options:
  • Product Failure Cause - Displays all root causes found in past investigations for this product specific failure mode.
  • All Product Failure Cause - Displays all root causes found in past investigations for all product failure modes.
  • Standard Product Failure Cause - Displays all causes listed in the standard cause table.
  • Root Cause Description - Enter a description of the root cause.
  • Root Cause Percentage - Select the percentage for which this root cause is weighted on the failure, such as 50% Operator not Skilled, 50% Missing Procedure.

NOTE: Click the Add Root Cause link to add an additional root cause(s).

Proposed Action Plans

Enter the information in the following Proposed Action Plans section fields. Click the Add Action Plan link to add additional action plans.

  • Finding number* - Click the drop down button and select the finding that this proposed action plan will apply to.
  • Plan Type* - Select a Plan Type option. Default plan types include the following:
  • Corrective - This option is typically used for a failure.
  • Preventive - This option is typically used to prevent a potential failure from happening.

NOTE: For more information on configuration, see Plan Type.

  • Plan No. - Enter the plan number of the action plan, such as 1, 2, or 3. This option does not have any business logic tied to it and is only used as a reference number.
  • Action Plan* - Enter the action plan.
  • Action Plan Description* - Enter the action plan description.
  • Assigned to Role* - Enter or zoom to select the user role for the user to be assigned to the action plan.

NOTE: For more information on configuration, see Roles.

  • Assigned to User* - Enter or zoom to select the user assigned to the action plan.

NOTE: For more information on configuration, see Users.

  • Due Date* - Enter the due date for the action plan.
  • Is Plan Complete - Select whether or not this action plan is complete.
  • No - This will later require the action plan to be signed off by the assignee. An implementation task will be routed to the action plan assignee.
  • Yes- The action plan is signed off and the user must enter information in the Completed By, Completed Date, and Comment fields. The task is then routed to the Approve Finding Response and then Verify Implementation steps. If this option is selected, then no implementation task is routed.
  • Skipped - The action plan is skipped and will not need to be signed off. A comment must be entered if this option is selected.

NOTE: Once an action plan has been entered and the Respond to Finding task is signed off, the action plan task is assigned and routed to the assignee.

Applicable Root Cause

Click the drop down button and select the applicable root cause for the action plan.

Policy

Enter the information in the following Policy section fields:

  • Verify Implementation - Specify whether or not the action plans must be verified. If Yes is selected, then a Verify Implementation task will be assigned and routed to the assignee.
  • If at least one action plan is NOT completed and Implementation Verification is not required, then the Implement Action Plan task is not rerouted.
  • If at least one action plan is completed and Implementation Verification is required, then the Verify Implementation task is routed.
  • If all action plans are skipped, then the Implement Action Plan task is closed.
  • If at least one action plan is NOT completed and Implementation Verification is Required, then the Implement Action Plan task is routed.

Team

Many different user roles are involved in the finding management process. Customers must configure their own roles to be used with the system. The following tasks (roles) have been configured as defaults in the Audit Management application.

  • Response Owner - Ownership is a required task in the finding record. The owner is not assigned any task other than ownership. Only one response owner can be defined.
  • Finding Response Approval - Finding Response approval is an optional task (if the Perform Finding Response Approval policy is set to Yes) and takes place after the finding is responded to.
  • Verify Implementation - Verify Implementation is an optional task (if the Verify Implementation policy is set to Yes) and takes place after action plans are implemented.

NOTE: If the role is defined as not required in Group Setup, then the Role and Task fields are editable.

Due Date

Enter or zoom to select a response due date.

Attachment

If necessary, click the Add Attachment + link and then browse to select files. Click the OK button.

  1. Click the Sign-off button.
    Result: The Sign-off window is displayed.
  2. Enter your user ID and password and then click the Sign-off button.
    Result: The Result window is displayed. The Result window is a window that displays after the response to the finding is signed off and asks the user where they would like to go next, such as to the Response Detail, to Approve Finding Response if the same user is assigned, or back to the Portal Page.

See Also

Approving a Finding Response

Implementing an Action Plan

Verifying Implementation

Audit Response End User Steps


Wednesday, December 4, 2019
12:03 PM